Webcam Capture
- One of the easiest ways to get video into YouTube is Webcam capture. This is designed for quick recordings. If you don't like the recording, you simply record it again.
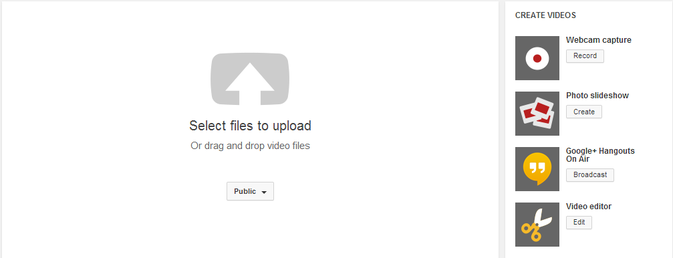
- Go to YouTube and click Upload and the Record Button.
You must be logged in to Gmail and have your YouTube account set up. - If you want to include video - you need to have a webcam, either built-in or external. Some document camera will work as a webcam. One feature of the newer Windows operating systems is that it will automatically detect a USB webcam and allow the webcam to function without any special software being installed.
- A microphone built-into the webcam or laptop/Chromebook is adequate for "quick and dirty" recordings, however, an external microphone or headset is recommended for higher quality audio.
 Set your Flash Player Settings
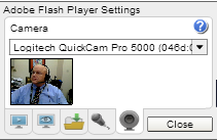
It is important to set your Adobe Flash Player settings to get the Webcam capture to work. After clicking "Record", right click anywhere on the screen and select "Settings". Follow these tips:
- Click the video camera and click on the image. Use the pull down menu to select your camera if needed. Ideally your camera image will be displayed.
- Click the microphone and select your microphone input. You may also need to select your microphone input and input level on your computer.
- Click on the screen with the eye on it and choose "Allow" and "Remember." Look for a bar which may pop up on under the address bar on your browser asking if you want to allow this Flash settings. Click to Allow.
- Before recording, when you talk the colored bar along the right side of the screen should bounce along with your voice. If it does not, check your microphone settings.
- Clicking the red "Start recording" button begins recording immediately. Be ready.
Activity - Webcam Recording
- Record a 30 - 60 second video of yourself talking to your students. Ideas include: explaining an assignment, explaining a lesson - to be played when you have a guest teacher.
- Remember to include some action with your body or hands. Don't just be a "talking head."
- When you are finished, play the video back and then save it. Give it a title (a time/date title is provided as a placeholder.) Add tags and description if desired.
- Set the privacy settings - Public, Unlisted, or Private.
- Show your video to at least one other person.
- A video may be deleted at any time in YouTube's Video Manager.
- The purpose of the webcam capture is not perfection. The purpose is to get something recorded quickly. If you don't like what you recorded, just record it again. There are other tools which are better suited for creating polished recordings (e.g. TechSmith's Camtasia Studio.) However creating a polished recording requires a greater time investment.
Alternative Activity - Photo Slideshow
- If you are unable to record using a webcam or simply desire an alternative activity, try creating a photo slideshow. If you do not have access to your own photos, you can use some of our photos. Start by going to one of the four sites listed on the Finding Images page.
- Add your selected photos to create a Photo slideshow. Rearrange photos as desired. Add transitions and music. Add a title. The only option not currently available is an option to add narration.
- You finished slideshow is now on YouTube, ready to share, link, or embed.
Upload Recorded Video to YouTube
- Record video using a digital camera or a digital video camera such as the Samsung HMX F90. These cameras normally will save the video to a SD card. Most laptops, Chromebooks, and some desktop computers have SD card readers built-in.
- Plug in the SD card, from the YouTube upload window, navigate to the folder on the SD card holding the video file and upload (or drag and drop the video file into the upload window.)
- This will also work when uploading a saved movie from a mobile phone, however most mobile phones have upload to YouTube built-in, saving this extra step.
Additional Resources
- Camtasia Studio is one of the premier screencasting apps. Click here for REMC $AVE Bid Project pricing.
